NMRPipe Installation Files from NIST IBBR
NMRPipe is an extensive software system for processing, analyzing, and exploiting multidimensional NMR spectroscopic data. This site contains NMRPipe installation files, as well as demo data with example processing and analysis schemes for conventional and Non-Uniformly Sampled (NUS) spectra.
The NMRPipe system is provided as-is and without warranties or guarantees of any kind.
Certain commercial equipment, instruments, software, or materials are identified in this presentation. Such identification does not imply recommendation or endorsement, nor does it imply that the material, equipment, or software identified is necessarily the best available for the purpose.
There is an unofficial NMRPipe Group to share information on use and features of NMRPipe ... you can join and post your own questions and comments:
https://groups.io/g/nmrpipeGeneral Requirements for Installing NMRPipe
The following are GENERAL REQUIREMENTS for installing and using NMRPipe:
-
A working knowledge of UNIX, including use of a text editor, and creation of shell scripts.
-
A suitable version of Linux, either native (most all PC versions), or via a Virtual Machine (VM). For Mac OS X, development and testing was done using VMware Fusion to install a virtual machine. For Windows, VMware Workstation was used for development and testing.
-
A user account with C-shell (
/bin/tcshor/bin/cshor/bin/csh) as the default shell. -
X11 Graphics server and the
xtermterminal window. -
A three-button scroll-wheel mouse or its equivalent.
The best and easiest way to use NMRPipe is
generally via Virtual Machine. Once VMware Workstation or VMware Fusion is installed, a
fully-configured NMRPipe
installation can be performed by downloading and unpacking a single large
.ova
or
.tZ
file.
See the section below on How to Install a Virtual Machine.
Some Presentations about NMRPipe, Spectral Processing, and Analysis


Contents of the NMRPipe Installation
The nmrDraw graphical interface will not work directly on Mac OS X. Instead, try a Linux Virtual Machine via VMware Fusion (See section: How to Install a Virtual Machine).
Depending on graphics hardware, the nmrDraw graphical interface might not work with the default Ubuntu 24 gnome destop environment. In case of problems, try the MATE X11 desktop (apt install mate-desktop-environment).
Likewise, while some versions of Windows include a Linux environment, the recommended solution for Windows systems is to install a Linux Virtual Machine.
Depending on which installation files are used, the NMRPipe installation procedure provides the following features and versions:
-
Applications including nmrPipe (pipeline processing for 1D-4D data), nmrDraw (NMRPipe's primary graphical interface), and nmrWish (NMRPipe's TCL/TK script interpreter).
-
Applications DC (residual dipolar coupling calculations), MFR (NMR homology search), and DYNAMO (simple simulated annealing structure calculation and analysis). These require dyn.tZ download.
-
Companion chemical shift analysis applications from the Ad Bax Group at the NIH: TALOS-N, TALOS+, SPARTA+, and PROMEGA.
Download dyn.tZ is also recommended. -
The SMILE Non-Uniform Sampling Reconstruction plugin from the Ad Bax Group at the NIH:
http://www.ibbr.umd.edu/api/nmrpipe/download?fileName=plugin.smile.tZ -
Conversion tools for Bruker, Varian, JEOL, and other formats.
-
64-bit Linux Intel versions of NMRPipe (Built on CentOS 6.5, Ubuntu 20, Ubuntu 22, Ubuntu 24)
-
64-bit Linux ARM (Apple Silicon) version of NMRPipe (Built on Ubuntu 22)
-
64-bit Mac OS X versions of NMRPipe: mac11_64 and mac11_arm64.
Important Note for Mac Users: The nmrDraw graphical interface will not work directly on Mac OS X. Instead, try a Linux Virtual Machine via VMware Fusion (See section: How to Install a Virtual Machine).
-
NMRPipe for Windows XP Pro running SFU 3.5 (version winxp; Legacy version, no longer updated as of NMRPipe Version 8.9).
-
NMRPipe for SGI Irix (version sgi6x, built on Irix 6.5 for mips2; Legacy Version, no longer updated, NMRPipe Version 9.2).
-
NMRPipe Sparc Solaris (version sol, built on SunOS 5.6; Legacy Version, no longer updated as of NMRPipe Version 7.3).
-
C Source Code for programs which read, write, and interpret the NMRPipe data format (directory format in the installation).
-
C Source Code for Creating NMRPipe Plug-In Functions for those who wish to develop their own processing functions that can work in the NMRPipe framework (directory nmruser in the installation).
-
NMRPipe on a Virtual Machine:
Note: Most all development and testing of NMRPipe is performed on Linux Virtual Machines (VM). This is generally the best option for installing and using NMRPipe on Windows PCs and Macs.
As an alternative to installing a hardware-specific version of NMRPipe as above, we also provide Linux Virtual Machines (VM) with NMRPipe pre-installed. There are two Linux VMs available, built on Ubuntu 22: one for Intel hardware and one for ARM hardware (Apple Silicon).
The Intel VM can be used on Windows Intel PCs via VMware Workstation.
The Intel VM can also be used on 64-bit Mac OS Intel systems via VMware Fusion.
The ARM VM can be used via VMware Fusion on Mac OS X systems with ARM hardware.
NMRPipe Installation Files
When downloading software from this web site, you are agreeing to our , including the terms that there is no right to privacy on this system, and that the the software from this web site is not to be redistributed without permission from the author.
Note also that it is usually easier to use command-line tools such as wget
or curl
to download files rather than downloading via web browser. See the notes below for examples.
Use care when downloading; depending on settings, certain web browsers may try to unpack a given file, convert it to a different text format, or display it as a web page rather than saving it as a file. If you experience such problems, try different methods for downloading and saving the files, or use a different web browser if possible.
Note well that if the file contents or names are changed in any way during download, the install procedure will not work:
-
When downloading, be sure to retain the exact file name shown here, renaming if needed!
-
When downloading, check that the final file size matches the size shown here exactly!
Click the download button to begin download.
As an alternative to downloading via a web browser, on linux systems
with the command wget
available, you can download
install files as needed. The wget
command will not overwrite existing files,
so be sure to delete any previous downloads first, for example:
/bin/rm install.com binval.com *.tZ

wget -O install.com "https://www.ibbr.umd.edu/api/nmrpipe/download?fileName=install.com"
wget -O binval.com "https://www.ibbr.umd.edu/api/nmrpipe/download?fileName=binval.com"
wget -O NMRPipeX.tZ "https://www.ibbr.umd.edu/api/nmrpipe/download?fileName=NMRPipeX.tZ"
wget -O s.tZ "https://www.ibbr.umd.edu/api/nmrpipe/download?fileName=s.tZ"
wget -O dyn.tZ "https://www.ibbr.umd.edu/api/nmrpipe/download?fileName=dyn.tZ"

wget -O talos_nmrPipe.tZ "https://www.ibbr.umd.edu/api/nmrpipe/download?fileName=talos_nmrPipe.tZ"
wget -O plugin.smile.tZ "https://www.ibbr.umd.edu/api/nmrpipe/download?fileName=plugin.smile.tZ"

wget -O NMRPipe_Ubuntu22_64.ova "https://www.ibbr.umd.edu/api/nmrpipe/download?fileName=NMRPipe_Ubuntu22_64.ova"
On Mac OS X systems, you can download install files with the curl
command.
The curl
command will overwrite any existing files:
curl -o install.com "https://www.ibbr.umd.edu/api/nmrpipe/download?fileName=install.com"
curl -o binval.com "https://www.ibbr.umd.edu/api/nmrpipe/download?fileName=binval.com"
curl -o NMRPipeX.tZ "https://www.ibbr.umd.edu/api/nmrpipe/download?fileName=NMRPipeX.tZ"
curl -o s.tZ "https://www.ibbr.umd.edu/api/nmrpipe/download?fileName=s.tZ"
curl -o dyn.tZ "https://www.ibbr.umd.edu/api/nmrpipe/download?fileName=dyn.tZ"

curl -o talos_nmrPipe.tZ "https://www.ibbr.umd.edu/api/nmrpipe/download?fileName=talos_nmrPipe.tZ"
curl -o plugin.smile.tZ "https://www.ibbr.umd.edu/api/nmrpipe/download?fileName=plugin.smile.tZ"

curl -o NMRPipe_Ubuntu22_64.ova "https://www.ibbr.umd.edu/api/nmrpipe/download?fileName=NMRPipe_Ubuntu22_64.ova"
A Quick Example: NMRPipe Installation on Ubuntu 22
sudo apt-get install tcsh
sudo apt-get install xterm
sudo apt-get install libx11-6:i386
sudo apt-get install libxext6:i386
sudo apt-get install xfonts-75dpi
sudo apt-get install msttcorefonts

cd
mkdir pipe
cd pipe

wget -O install.com "https://www.ibbr.umd.edu/api/nmrpipe/download?fileName=install.com"
wget -O binval.com "https://www.ibbr.umd.edu/api/nmrpipe/download?fileName=binval.com"
wget -O NMRPipeX.tZ "https://www.ibbr.umd.edu/api/nmrpipe/download?fileName=NMRPipeX.tZ"
wget -O s.tZ "https://www.ibbr.umd.edu/api/nmrpipe/download?fileName=s.tZ"
wget -O dyn.tZ "https://www.ibbr.umd.edu/api/nmrpipe/download?fileName=dyn.tZ"
wget -O talos_nmrPipe.tZ "https://www.ibbr.umd.edu/api/nmrpipe/download?fileName=talos_nmrPipe.tZ"
wget -O plugin.smile.tZ "https://www.ibbr.umd.edu/api/nmrpipe/download?fileName=plugin.smile.tZ"

chmod a+rx *.com

./install.com
After the install procedure is complete:
-
Edit
~/.cshrcif needed to insert NMRPipe initialization commands. SeeREADME_NMRPIPE_USERSin the installation directory for details. -
If desired, delete the
*.tZinstallation files. -
If desired, delete the unneeded versions of
nmrbin.*binary directories. -
Log out and log in again before using the software.
Citation Information
Frank Delaglio, Stephan Grzesiek, Geerten. W. Vuister, Guang Zhu, John. Pfeifer, and Ad Bax,J. Biomol. NMR. 6, 277-293 (1995).
Jinfa Ying, Frank Delaglio, Dennis A. Torchia, and Ad Bax.J Biomol. NMR. 68, 101–118 (2017).
Yang Shen, and Ad Bax, J. Biomol. NMR, 56, 227-241(2013).
Yang Shen, Frank Delaglio, Gabriel Cornilescu, and Ad Bax, J. Biomol. NMR, 44, 213-223 (2009).
Yang Shen and Ad Bax, J. Biomol. NMR, 48, 13-22 (2010)
Hardware Versions, Applications, and Features of NMRPipe
linux212_64: 1 Linux Intel PC 64-bit (Built on CentOS 6.5).
linux231_64: Linux Intel PC 64-bit (Built on Ubuntu 20).
linux235_64: Linux Intel PC 64-bit (Built on Ubuntu 22).
linux239_64:2 Linux Intel PC 64-bit (Built on Ubuntu 24, Requires Mate X11 Desktop).
linux235_arm64: Linux Intel PC 64-bit (Built on Ubuntu 22 Virtual Machine on Mac ARM Hardware).
mac11_64:3 Mac OS 12.6.6 Intel 64-bit (No nmrDraw!)
mac_arm643 Mac OS 13.3.1 M1 64-bit (No nmrDraw!).
linux9: Linux Intel PC 32-bit (glibc 2.9).
linux: Linux Intel PC 32-bit (glibc 2.3).
mac11: Mac OS X Intel 32-bit (Mac OS X 10.11.2, gcc 4.2.1, XQuartz 2.7.8).
mac: Mac OS X PPC and Intel (Mac OS X 10.5.8, gcc 4.0.1, XQuartz 2.6.3).
winxp: Windows XP Pro (Requires Microsoft SFU 3.5 and X11 Server).
sgi6x: SGI Irix (IRIX 6.5).
sol: Sparc Solaris (Sparc SunOS 5.6, Legacy NMRPipe Version 7.3).
1 Has 32-bit version of nmrDraw, needs 32-bit compatibility libraries
2 Depending on graphics hardware, nmrDraw might not work on the default Ubuntu 24 gnome desktop. In case of problems, use an alternative such as MATE x11 (apt install mate-desktop-environment)
3 nmrDraw does not work directly on Mac OS. Try using a Linux virtual machine instead (See section: How to Install a Virtual Machine)
-
NMRPipe: comprehensive NMR conversion and processing, 1D-4D, with options for Non-Uniformly Sampled data (NUS).
-
NMRDraw: interactive phasing, display, 1D-4D peak detection.
-
NMRWish: TCL/Tk scripting for custom display and analysis. Many applications are built from nmrWish scripts, including:
-
autoFit: Spectral lineshape fitting for 1D-4D data and spectral series.
-
scroll: Interactive strip viewing for related 3D spectra.
-
specView: 1D and 2D Spectral Series Display with Principal Component Analysis (PCA).
-
titrView: 2D Chemical Shift Titration Analysis.
-
MFR: NMR Parameter Fragment Homology Search (Molecular Fragment Replacement).
-
ACME: COSY proton-proton coupling measurement.
-
-
DC: Dipolar Coupling Calculations.
-
DYNAMO: molecular structure analysis, including:
-
Add protons to a protein PDB structure.
-
Analyze and report secondary structure.
-
Simulated Annealing structure calculation.
-
Simulation of dipolar couplings and protein backbone chemical shifts, estimation of alignment tensor parameters from measured couplings.
-
List, manipulate, and display structure parameters such as backbone angles.
-
TALOS+: prediction of protein phi/psi backbone angles from chemical shifts.
TALOS-N: prediction of protein phi/psi backbone angles and chi sidechain orientations from chemical shifts.
SPARTA+: prediction of protein chemical shifts from structure.
Introduction to Installation of NMRPipe
If you are re-intalling NMRPipe, do a clean re-installation.
This means renaming or deleting the existing installation,
removing all NMRPipe initialization commands from the .cshrc
file
in your home directory, then deleting the .cshrc
file if it has no
other contents (it will be re-created by the install procedure). Be sure to log out
and log in again before continuing with the new installation.
Most of the effort required to install NMRPipe will usually involve preparing the computer system so that it has the libraries, commands, fonts, and configurations needed to use NMRPipe. The install procedure itself is simple; once the required files are downloaded, often just:
./install.comUse the +type
install a specific version of NMRPipe, for example:
./install.com +type mac11Use the +src
option to install NMRPipe using *.tZ installation files that are stored
in another directory, such as on a USB key. For example, if the *.tZ files are in a
directory /media/USB16/pipefiles
:
./install.com +src /media/USB16/pipefilesIf there are any problems installing NMRPipe, please review the install instructions carefully, including the section about Installation Problems below.
This text describes both the general and system-specific details for installation of NMRPipe. Please review both the general and system-specific details carefully before installing the software -- this will help us to use our resources in the most effective way as we continue to develop and distribute NMRPipe.
NMRPipe is a UNIX-based system, and so it will require a familiarity of UNIX to install and use the software. This means that an NMRPipe user must be familiar with the UNIX command-line and environment, and know how to create and edit UNIX shell-scripts using a text editor. This is true for all versions of NMRPipe, including the Mac OS X and Windows XP versions..
Some web browsers, especially those used on Windows and Mac OS X, may change the extensions of downloaded files, or attempt to decompress any downloaded files which have been previously compressed. Therefore, when downloading NMRPipe files, take care to retain the exact original file names, and disable any automatic decompression or adjustment of downloaded files. The size of the downloaded files should exactly match the posted sizes.
Common NMRPipe Installation Problems
Important Note for Mac Users:The nmrDraw graphical interface will not work directly on Mac OS X. Instead, try a Linux Virtual Machine via VMware Fusion (See section: How to Install a Virtual Machine).
Important Note for Ubuntu 24 Users:The nmrDraw graphical interface might not work with the default Ubuntu 24 gnome destop environment. In case of problems, try the MATE X11 desktop (apt install mate-desktop-environment).
The most common installation problems involve one of these issues:
-
The user's default shell must be set to the C-Shell (/bin/csh); this is often done with the UNIX "chsh" command, or by system-specific methods described below. Alternatively, you can simply start the C-shell by typing
cshto start a C-shell before using any NMRPipe facilities. -
The user must have a
.cshrcfile in their home directory, which includes the appropriate commands for establishing the UNIX environment variables required by NMRPipe. The necessary initialization commands can be found in the file README_NMRPIPE_USERS which is created during installation. If these initialization commands are not executed properly, or if the initialization settings are changed by settings for other software, error messages like the following will result:nmrPipe: Command not found. cannot find manpage for 'nmrPipe' NMRTXT: Undefined variable Error in startup script: can't read "env(TCLPATH)": no such variable Application initialization failed: Can't find a usable init.tcl error while loading shared libraries:libxview.so error while loading shared libraries:libtcl8.4.so error while loading shared libraries:libtk8.4.so error while loading shared libraries:libBLT24.so Can't find a usable init.tcl XView error: Cannot open connection to window serverAs noted elsewhere, it is important to LOG OUT and LOG IN AGAIN after changing the
.cshrcfile in order for the NMRPipe initialization to become active. Since other configuration changes might require restarting the computer, it is best to perform a complete restart if possible.If the NMRPipe initialization is performed properly, several NMRPipe-related environment variables will be defined. Use the UNIX command
printenvto list the current environment variables, in order to check that the NMRPipe-related ones are defined. for example:% printenv | fgrep -i nmr TCL_LIBRARY=/u/delaglio/nmr/nmrtcl/tcl8.4 BLT_LIBRARY=/u/delaglio/nmr/nmrtcl/blt2.4z NMRBIN=/u/delaglio/nmr/nmrbin.linux9 NMR_IO_SELECT=0 NMRPIPE_TCL_LIB=/u/delaglio/nmr/nmrtcl/tcl8.4 NMRPIPE_BLT_LIB=/u/delaglio/nmr/nmrtcl/blt2.4z NMRCHECK=ALL NMRTXT=/u/delaglio/nmr/nmrtxt NMR_AUTOSWAP=1 NMRPATHSET=TRUE NMR_IO_TIMEOUT=0 NMRLIB=/u/delaglio/nmr/nmrbin.linux9/lib NMRBINTYPE=linux9 NMRPIPE_TK_LIB=/u/delaglio/nmr/nmrtcl/tk8.4 TK_LIBRARY=/u/delaglio/nmr/nmrtcl/tk8.4 NMR_TCLTK8=TRUE NMRBASE=/u/delaglio/nmr -
Many NMRPipe applications make use of output from C-shell scripts, many of which may execute a user's
.cshrcfile when invoked. So, it is important that the commands in.cshrcdo not produce any text output when the.cshrcfile is executed, or some NMRPipe applications may fail. You can test for this by counting the characters produced when the.cshrcfile is executed directly, which should produce the output0:csh ~/.cshrc | wc -c -
Many recent 64-bit versions of Linux do not install the 32-bit libraries required by NMRPipe. In this case, all of the programs of NMRPipe will fail to run, often generating the error message
Command not found. See the notes on Linux Platform installation below for more information. -
In some cases, especially on SGI systems and many Linux environments, the fonts required by the
nmrDrawapplication are not present or not loaded properly. If the required fonts are not available, thenmrDrawprogram may fail and generate an error message such as:XView error: Cannot open connection to window serverThe NMRPipe installation includes fonts suitable for most systems; in most cases, this kind of problem can be fixed by executing an NMRPipe font.com initialization script from within the user's
.cshrcfile.In other cases, such as Linux Fedora Core 12, the fonts required by nmrDraw are not available by default, but can be downloaded and installed with a command like the following:
yum install xorg-x11-fonts-100dpi xorg-x11-fonts-ISO8859-1-100dpi yum install xorg-x11-fonts-75dpi xorg-x11-fonts-ISO8859-1-75dpi yum install xorg-x11-fonts-misc -
Certain Linux environments, such as Ubuntu, don't have "Helvetica" and some other common fonts. This can affect the appearance of NMRWish-based graphical applications, such as the
varianandbrukercommands. Installing the following font packages might help:apt-get install xfonts-75dpi apt-get install msttcorefonts -
Certain graphics environments may not be suitable, depending on the window manager (the program that manages the graphical desktop of the computer) and the color settings (such as 8-bit color or 24-bit color). For example, certain versions of the Linux Gnome Desktop graphics environment using 32-bit color might cause nmrDraw to run slowly or not at all, or cause problems in other graphical applications like TALOS+. Such problems can be often be fixed by adjusting the color settings (24-bit color is recommended) or using a different window manager (such as Linux KDE instead of Gnome).
-
In order to run the
nmrDrawprogram, Mac OS X users might have to install updated versions of Mac's X11 graphics server. They might also need to adjust X11 mouse focus settings. More details are given in the Mac OS X installation notes below.
How to Install NMRPipe: an Overview
The specific steps needed to install NMRPipe will differ depending on the hardware and operating system, and also on how a given computer or its network is configured. The installation will require that you are familiar with UNIX and the UNIX command line, and that you already know how to create and edit UNIX shell scripts.
Some of the NMRPipe directories contain demo data and scripts which require read-write access. For this reason, it is often useful to install "personal" copies of NMRPipe rather than install the software via the "root" account.
If you have a version of NMRPipe already installed, it is important to remove or rename any existing NMRPipe initializations and files before installing new versions of NMRPipe. These steps are described in more detail below. After removing an existing NMRPipe installation, it is important to log out before performing a new installation.
The specific details for installing NMRPipe on particular operating systems are given in the sections below. In general, the steps for installing NMRPipe will involve:
-
Set up a system with UNIX, an X11 graphics server, a user account with the C-shell as the default shell, and with the
xtermterminal window available from the UNIX command-line. The system should have a three-button scroll-wheel mouse or its equivalent. -
Create a directory for the NMRPipe installation, where you have complete permissions to create, read, write, and execute files.
-
Put the NMRPipe install files into the selected install directory. The usual files are as follows, although you may be provided with additional files for extra features or updates:
install.com (required, the install script)
binval.com (required, an auxiliary script which determines system type)
NMRPipeX.tZ (required, all current versions of NMRPipe)
s.tZ (required, script updated for NMRPipe)
talos_nmrPipe.tZ (optional, files required for TALOS+ and SPARTA+)
plugin.smile.tZ (optional, files required for SMILE NUS Reconstruction)
dyn.tZ (optional, files required for DYNAMO and MFR)
-
Depending on how the NMRPipe install files are obtained, it will be necessary adjust the file permissions so that it is possible to read all of the install files and to execute the install scripts. This will generally be performed via the UNIX command
chmod, for example:chmod a+r *.tZ *.Z *.tar chmod a+rx *.com -
From an
xtermterminal window, execute the install.com script; in most cases, no arguments will be required; it will be sufficient to make the install scripts executable, then run the install.com script. Note: Use the command./install.com +helpto generate a list of install command-line options. If a specific version of NMRPipe is desired use the+typeoption. For example to use the legacy Linux version:./install.com +type linux -
During the install procedure, one or more initialization script files will be created. These initialization scripts must be executed from within the
.cshrcfile in the user's home directory. They will establish the environment variables and executable path which are needed to run the components of NMRPipe. The details about the initialization scripts and how to use them in.cshrcwill be listed in the fileREADME_NMRPIPE_USERSwhich is also created during installation:com/nmrInit.*.com(where*is linux9, mac, winxp, etc.)dynamo/com/dynInit.com(if DYNAMO is installed)com/font.com(font initialization, only needed for some systems).
-
Once NMRPipe is installed, and the user's
.cshrcfile has been adjusted appropriately, log out and log in again. Note that it is important to LOG OUT and LOG IN AGAIN after changing the.cshrcfile in order for the NMRPipe initialization to become active.After logging in again, activate an
xtermterminal window; it should then be possible to use the components of NMRPipe from thextermcommand-line.
In summary, the NMRPipe install procedure will look something like this
example, where the home directory is /Users/frank
:
(Use methods as needed to set default shell to C-shell)
(Activate the X11 Graphics server if needed)
(Create an "xterm" window which has a C-shell command-line)
cd /Users/frank
mkdir pipe
cd pipe
(Get files install.com binval.com NMRPipeX.tZ s.tZ talos_nmrPipe.tZ dyn.tZ etc.)
chmod a+r *.tZ *.Z *.tar
chmod a+rx *.com
./install.com
cd /Users/frank
(Edit .cshrc to insert NMRPipe initialize commands if needed)
(Log out, log in again)
(Start an "xterm" window, test the software)
(Adjust the software settings if needed)
(Remove .tZ files if desired)NOTE well that in some cases, the install procedure may generate informational warning message or error messages, but still complete correctly. So, after the installation procedure, you should try TESTING THE INSTALLATION as below. After testing, you may want to make OTHER ADJUSTMENTS, also below.
As a convenience, the install.com procedure above can be adjusted
to read the installation files from some other source location,
for example from a USB flash drive. This is done by the install.com +src option.
In such a case, only the files "install.com" and "binval.com"
need to be in the current directory. For example, if all of the install
files are stored together on the USB drive mounted
as /media/USB16
and
the home directory is /Users/frank
:
(Use methods as needed to set default shell to C-shell)
(Activate the X11 Graphics server if needed)
(Create an "xterm" window which has a C-shell command-line)
cd /Users/frank
mkdir pipe
cd pipe
cp /media/USB16/install.com .
cp /media/USB16/binval.com .
chmod a+rx *.com
./install.com +src /media/USB16
cd /Users/frank
(Edit .cshrc to insert NMRPipe initialize commands if needed)
(Log out, log in again)
(Start an "xterm" window, test the software)
(Adjust the software settings if needed)
(Remove .tZ files if desired)As a convenience, the install.com procedure above can be adjusted
to read the installation files from some other source location,
for example from a USB flash drive. This is done by the install.com +src option.
In such a case, only the files "install.com" and "binval.com"
need to be in the current directory. For example, if all of the install
files are stored together on the USB drive mounted
as /media/USB16
and
the home directory is /Users/frank
:
The installation procedure performs several software and
graphics tests to check the status of the installation. In some
cases, these tests might issue warning messages even though the
installation completes properly. In some cases, these tests
may fail in a way which interrupts the installation. If this
happens, you can suppress the post-installation software tests
with the +nopost
option, for example:
./install.com +src /home/frank/tar +nopostClean Re-Install: How to Remove an Existing Installation of NMRPipe
If you have an existing installation of NMRPipe, it must be removed or disabled before performing
a new installation. This means you must remove any existing initialization commands
in the .cshrc
file in your home directory, and log out before continuing.
-
Rename or delete the existing NMRPipe files. These are in the directory defined by the environment variable $NMRBASE.
-
Remove any existing NMRPipe initialization commands from the
.cshrcfile in your home directory. If the.cshrccontains only NMRPipe initializations, you can rename it or delete it; when new versions of NMRPipe are installed, the install procedure will automatically create a suitable.cshrcfile if one doesn't exist. The initialization commands in the.cshrcwill look something like this:if (-e /Users/nmruser/pipe/com/nmrInit.mac11_64.com) then source /Users/nmruser/pipe/com/nmrInit.mac11_64.com endif if (-e /Users/nmruser/pipe/dynamo/com/dynInit.com) then source /Users/nmruser/pipe/dynamo/com/dynInit.com endif if (-e /Users/nmruser/pipe/com/font.com) then source /Users/nmruser/pipe/com/font.com endif -
Log out and log in again. This step is important, to insure that none of the old NMRPipe environment variable settings still exist, and that any previous NMRPipe font settings for graphics display are no longer active.
How to Install a Virtual Machine Pre-Configured with NMRPipe
Most all development and testing of NMRPipe is done on Linux Virtual Machines (VMs), and this is generally the best way to use NMRPipe. Development and testing is done via VMware Workstation on Windows PCs, and via VMware Fusion on Mac OS X systems, although other platforms such as VirtualBox might be sufficient.
At the time of this writing, VMware Workstation and VMware Fusion are available for personal use at no cost via Broadcom. Downloading the software will generally require making an account on the Broadcom website. Broadcom's procedures to get VMware are new; expect that creating an account and finding the VMware files to download will take some effort:
The steps for installing the virtual machine are slightly different depending on whether the it is
saved as a .ova
file or a .tZ
compressed tar archive:
-
On Windows PCs, install VMware Workstation. On Mac OS Intel and ARM systems, install VMware Fusion.
-
Download the appropriate virtual machine from this site:
For Windows PCs and Mac OS Intel systems: NMRPipe_Ubuntu22_64.ova
For Mac OS ARM systems (Apple Silicon): NMRPipe_Ubuntu22_ARM.tZ
-
To install via an .ova File: Use the VMware application to unpack the NMRPipe_*.ova file. When VMware is already installed, double-clicking on the .ova file will automatically start VMware and unpack the .ova file. The virtual machine is large (more than 5-10Gb) and will grow larger with use, so choose a suitable location, and keep in mind any automated backup procedures that might be in use on your computer.
To install via a .tZ Compressed tar Archive: use a
tarcommand like the following to unpack the VM:tar zxvf NMRPipe_Ubuntu22_ARM.tZThe .tZ archive will unpack as a directory such as "
Ubuntu 22 ARM 64-bit.vmwarevm" ... use the VMware Fusion File/Open option to select this directory and run the virtual machine.When the virtual machine is installed and run for the first time, there might be pop-up windows with notices and related questions:
-
Notices may say that the virtual machine is in use. If so, use the option to "Take Ownership".
-
Notices may ask if the virtual machine was moved or was copied. If so, use the option "I copied it".
-
-
Once the VM is installed, the .ova or .tZ files are no longer needed and can be deleted.
-
Run the NMRPipe Virtual Machine. Running the virtual machine is like turning on a PC – an operating system will start in the usual way, but in its own window.
-
First Time Configuration. When you start the virtual machine for the first time, you might see messages about VM settings and virtualization options or BIOS settings. Consult VMware documentation and adjust settings as needed.
-
When the virtual machine starts, you can log in via the “nmruser” user account. The password for the "nmruser" account is “nmrpipe” and the root password is also "nmrpipe" (all lower case). Additional accounts can be created as desired via the usual Linux options. Note also that the Virtual Machine can be configured so that it is possible to drag and drop files and folders between the Virtual Machine window and the Desktop of the host operating system. Consult VMware documentation for more info.
-
Use NMRPipe. Once you log in as “nmruser”, you can open a terminal window from the command panel. All the usual facilities of NMRPipe will be available.
-
Configure the Virtual Machine environment and Linux. Consult the virtual application (VMWware or VirtualBox) documentation for details on configuring the virtual player for options such as use of removable devices, shared folders, printing, networking and software updates. You can configure the virtual Linux operating system as you would any other Linux installation. The root password for the virtual machine is “nmrpipe”.
-
Important: Exit the Virtual Machine. When you are done with a session, don’t exit the virtual machine by closing the window via the usual "X" icon; this is the equivalent of unplugging a PC while it is running, and might make the virtual machine unusable. We also recommend that you do not suspend the virtual machine. Instead, when exiting the virtual machine, be sure to shut it down via the system menus for Shutdown, just as you would for an actual PC.
What Users Should Do to Run NMRPipe
The tools and scripts of the NMRPipe system require use of the C-shell (/bin/csh) or the related T C-Shell (/bin/tcsh) as the user's default shell. Other shells, such as the Bourne Shell "sh", or the "bash" shell, will not be suitable. So, in order to use NMRPipe, users may have to reset their default shell accordingly. The UNIX command "chsh" is commonly used to set the default shell; see the UNIX "man chsh" help text for information on how to use this command on your system.
If the automated installation succeeded, users need only
execute the initialization scripts that were created,
by adding lines such as the following to their .cshrc
file.
These commands should preferably be added at the very end of the
.cshrc
file that the NMRPipe environment variables do not get reset
accidentally by other application initialization commands.
The details about these initialization scripts and how to use
them in .cshrc
will be listed in the file README_NMRPIPE_USERS
which is also created during installation.
As noted above,
it is important to LOG OUT and LOG IN AGAIN after changing
the .cshrc
file in order for the NMRPipe initialization to become active.
Also, regarding fonts: only use the "font.com" script if the "install.com" procedure or README_NMRPIPE_USERS file indicates that it is needed for your system (mostly SGI/IRIX systems, and some versions of Linux):
if (-e /u/frank/pipe/com/nmrInit.linux9.com) then
source /u/frank/pipe/com/nmrInit.linux9.com
endif
if (-e /u/frank/pipe/dynamo/com/dynInit.com) then
source /u/frank/pipe/dynamo/com/dynInit.com
endif
if (-e /u/frank/pipe/com/font.com) then
source /u/frank/pipe/com/font.com
endifTesting the Installation
In order to confirm that you can access the software correctly, try logging out first, then logging in and using these commands:
which nmrPipe (Check that programs can be found)
nmrPipe -help (Run program in help mode)
man nmrPipe (Check manual pages)
bruker (varian delta) (Run the graphical conversion interface)
nmrDraw (Run the graphical interface)When using graphical programs in the NMRPipe system, note that all versions of the software expect use of a three-button scroll-wheel mouse or its equivalent.
Other Adjustments
NMRDRAW: after testing, you may wish to edit the script called "nmrDraw". The font size argument called "-scale" can be adjusted to suit user preferences for text in buttons, menus, etc. The font arguments "-type1" (regular font) and "-type2" (large font) will affect the size of text used for axes and labels, and for text editing windows. Possible values for "-scale", "-type1" and "-type2" include "small", "medium", "large", and "extraLarge".
You can also adjust the nmrDraw window size to compensate for space on the screen used by window manager command panels, etc. Add the options "-xAdj" or "-yAdj" followed by a pixel count to reduce the nmrDraw window size by the given number of pixels (for example " -xAdj 20").
Many NMRPipe applications are actually NMRWish TCL/TK scripts. These use a small number of common font definitions, which can be adjusted by setting environment variables. Examples are listed in the com/nmrInit.*.com file, and look like this:
setenv NMRPIPE_SMALLFONT "-adobe-helvetica-medium-r-*-*-*-100-*-*-*-*-*-*"
setenv NMRPIPE_BIGFONT "-adobe-helvetica-medium-r-*-*-*-180-*-*-*-*-*-*"
setenv NMRPIPE_STDFONT "-adobe-helvetica-medium-r-*-*-*-120-*-*-*-*-*-*"
setenv NMRPIPE_BOLDFONT "-adobe-helvetica-bold-r-*-*-*-120-*-*-*-*-*-*"
setenv NMRPIPE_FIXEDFONT "-*-courier-medium-r-*-*-*-120-*-*-*-*-*-*"
setenv NMRPIPE_TYPINGFONT "-*-courier-medium-r-*-*-*-100-*-*-*-*-*-*"
setenv NMRPIPE_AXISFONT "-*-lucidatypewriter-bold-r-*-*-*-120-*-*-*-*-*-*"Installation Problems
There are a few common difficulties with installation of NMRPipe, and these generally relate to the various environment variables required to use the software, or to the font settings used by the "nmrDraw" program.
If there are install problems, besides reviewing the notes here, see also the next sections for system-specific installation details.
The most common problem when first using the installation concerns the proper setting of environment variables. As described above, the environment variables needed by NMRPipe are established by the script "com/nmrInit.*.com" created during the install procedure. This script sets environment variables and executable path for the C-Shell; it WILL NOT work for "bash" or "sh" shells.
The necessary initialization commands can be found in the file README_NMRPIPE_USERS which is created during installation.
If the various NMRPipe environment variables are not defined properly, "Undefined variable" or "library" error messages will be generated, for example:
NMRTXT: Undefined variable
Error in startup script: can't read "env(TCLPATH)": no such variable
Can't find a usable init.tcl
error while loading shared libraries:libxview.so
error while loading shared libraries:libtcl8.4.so
error while loading shared libraries:libtk8.4.so
error while loading shared libraries:libBLT24.soIf there are problems running the software, look at the definitions
in your version of "com/nmrInit.*.com". Then, use the "printenv"
command to see if the actual current environment is set up as
required. In many cases, certain environment variables need by NMRPipe
may get reset by other commands elsewhere in the .cshrc
file. To avoid this problem,
put the NMRPipe initialization commands at the end of the .cshrc
file.
As noted elsewhere, it is important to LOG OUT and LOG IN AGAIN after changing
the .cshrc
file in order for the NMRPipe initialization to become active.
The "nmrDraw" program uses certain "lucida" and "open look" fonts
which are not available on all systems by default. The NMRPipe
install procedure will attempt to test whether or not these fonts
are available, and provide them if needed. The script "com/font.com"
is used to provide the fonts on systems which do not have them.
This file is usually executed from a user's .cshrc
file.
If the fonts cannot be found, "nmrDraw" will issue error messages like this one:
XView warning: Cannot load font
XView error: Cannot open connection to window serverIf this happens, check the definitions in file "com/font.com", and adjust them if needed.
Alternatively, on some Linux systems, such as Fedora Core 12, fonts needed by NMRDraw are not available by default, but can be downloaded and installed with the following command:
yum install xorg-x11-fonts-100dpi xorg-x11-fonts-ISO8859-1-100dpi
yum install xorg-x11-fonts-75dpi xorg-x11-fonts-ISO8859-1-75dpi
yum install xorg-x11-fonts-miscCertain Linux environments, such as Ubuntu, don't have "Helvetica" and
some other common fonts. This can affect the appearance
of NMRWish-based graphical applications, such as the varian
and bruker
commands. Installing the following font package might help:
apt-get install msttcorefontsIn some cases, "nmrDraw" may display "XView Notifier Error" or similar messages; this will generally not cause a problem in the actual use of the software. However, in many cases, these error messages can be suppressed by editing the "nmrDraw" script to add or remove a font specification "-fn", for example,
... " -fn Courier " ...Use the unix command "which nmrDraw" to find the script on your installation.
Graphics Applications Such as TALOS+ Have Distorted Displays
Certain graphics environments may be problematic for nmrDraw and other graphical applications, such as the TALOS+ Ranachandran display. This can sometimes depend on the window manager (the program that manages the graphical desktop of the computer) or the color settings (such as 8-bit color or 24-bit color). For example, certain versions of the Linux Gnome Desktop graphics environment using 32-bit color might cause nmrDraw to run slowly or not at all. Such problems can be often be fixed by adjusting the color settings (24-bit color is most common), by using a different window manager (such as Linux KDE instead of Gnome), or by updating the display drivers. In the most difficult cases, we have sometimes resorted to changing graphics hardware ... in the experience of NMRPipe's author, NVidia graphics hardware (rather than Radeon or Intel) seems to be the best choice for NMRPipe.
Recently, some versions of Linux include special tools for entering Asian language text, such as SCIM. Some of these "Input Method" tools may cause problems with NMRDraw and other graphical programs. If you have problems on Linux systems entering text into graphics programs or using graphical menus, etc, find and disable any special input methods such as SCIM that might be running.
The nmrDraw graphical interface will not work directly on Mac OS X. Instead, try a Linux Virtual Machine via VMware Fusion (See section: How to Install a Virtual Machine).
A particular installation of NMRPipe might not be compatible with all versions of a given operating system. For example, the current Mac OS X version of NMRPipe will generally require a system with Mac OS X version 10.4 or higher. In these cases, none of the programs in the NMRPipe system will work unless the operating system is upgraded appropriately.
In the case of current Linux versions, NMRPipe requires 32-bit compatibility
libraries when run on 64-bit hardware. If these libraries are not
installed, every NMRPipe program will issue an error messages such as
Command not found
even though the program is available
on the executable path and the NMRPipe environment variables are set properly.
In these cases, use the appropriate commands to install 32-bit
libraries etc. as needed -- the details will depend on your version
of Linux, and might be something like one of the following:
sudo apt-get install ia32-libs
yum install glibc
yum install glibc.i686Installing NMRPipe on Mac OS X
Important Note for Mac Users: The nmrDraw graphical interface will not work directly on Mac OS X. Instead, try a Linux Virtual Machine via VMware Fusion (See section: How to Install a Virtual Machine)
There are currently two Mac OS X versions of NMRPipe: mac11_64 for Intel systems, and mac11_arm64 for M1 hardware.
The various NMRPipe graphical tools will require that an X11 graphics server (XQuartz) and libraries have been installed. Also, the graphical tools expect the use of a three-button scroll-wheel mouse or its equivalent.
Generally, NMRPipe facilities are operated from the command-line
of an xterm
terminal window. In some cases,
some NMRPipe components will not work
when used from a Mac xterm
terminal window.
If problems arise using a Mac OS X xterm
window, try using the Mac OS X terminal
application instead. The terminal
application
can be found in the Mac OS X Applications/Utilities folder.
Some Mac web browsers, especially Safari, may change the
extensions of downloaded files, or attempt to decompress any
downloaded files which have been previously compressed. Therefore,
when downloading NMRPipe files, take care to retain the exact
original file names, and disable any automatic decompression or
adjustment of downloaded files. A better choice is to use the curl
command-line utility to download files, for example:
curl -o install.com "https://www.ibbr.umd.edu/api/nmrpipe/download?fileName=install.com"
curl -o binval.com "https://www.ibbr.umd.edu/api/nmrpipe/download?fileName=binval.com"
curl -o NMRPipeX.tZ "https://www.ibbr.umd.edu/api/nmrpipe/download?fileName=NMRPipeX.tZ"
curl -o s.tZ "https://www.ibbr.umd.edu/api/nmrpipe/download?fileName=s.tZ"and so on.
-
An X11 graphics server must be installed, properly configured, and running. Current versions of Mac OS X require that you download and install a recent version of the XQuartz X11 graphics server, which can be found at https://www.xquartz.org/.
Once an X11 graphics server is running, adjust its settings: on the X11 Preferences
class="plain"Windowstab, set checkmarks ON beside "Click-Through Inactive Windows" "Focus Follows Mouse" and "Focus on New Windows":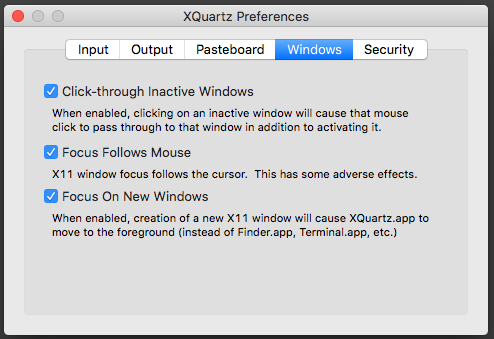
-
Since the X11 graphics server should be started in order to install or use NMRPipe, it will be helpful to drag a copy of this application to the Mac OS X command Dock so that you can start and control the X11 graphics server easily at any time.
-
Once X11 is running, use "Applications/Terminal" to create
xtermterminal windows. Use these windows for all NMRPipe installation and command execution. If problems arise using anxtermwindow, try using the Mac OS Xterminalapplication instead. If you use the Mac OS Xterminalapplication, be sure to configure the Preferences so that the terminal window uses the C-shell. -
As noted presviously, NMRPipe requires use of the c-shell (or t C-shell) not bash or bourne shell. On the Mac, depending on the specific version of the operating system, there are several places places where a default shell is set.
-
Under System Preferences, open Accounts Preferences.
-
Unlock preference settings by clicking on the lock icon in the lower left.
-
Right-click on a User entry and select the Advanced Options menu.
-
Select /bin/csh (or /bin/tcsh) from the login shell pull-down menu, then click on OK.
-
As noted in the Overview, the NMRPipe install procedure performs
several software and graphics tests to check the status of the
installation. If these tests fail in a way that interrupts
the installation, you can suppress the post-installation checks
using the +nopost
install option.
So, the typical steps for installing NMRPipe on a Mac system will be:
(Install a three-button scroll-wheel mouse)
(If possible, use the methods above to set the default shell to C-shell)
(Update X11 from https://www.xquartz.org/)
(Configure X11 window focus settings)
(Drag X11 from Applications/Utilities to the Apple command dock)
(Execute the X11 application to start the graphics server)
(Create a new "xterm" window, run csh if the C-shell is not the default shell)
cd <i><div>(go to home directory)</div></i>
mkdir nmr
cd nmr
curl -o install.com "https://www.ibbr.umd.edu/api/nmrpipe/download?fileName=install.com"
curl -o binval.com "https://www.ibbr.umd.edu/api/nmrpipe/download?fileName=binval.com"
curl -o NMRPipeX.tZ "https://www.ibbr.umd.edu/api/nmrpipe/download?fileName=NMRPipeX.tZ"
curl -o s.tZ "https://www.ibbr.umd.edu/api/nmrpipe/download?fileName=s.tZ"
curl -o dyn.tZ "https://www.ibbr.umd.edu/api/nmrpipe/download?fileName=dyn.tZ"
curl -o talos_nmrPipe.tZ "https://www.ibbr.umd.edu/api/nmrpipe/download?fileName=talos_nmrPipe.tZ"
curl -o plugin.smile.tZ "https://www.ibbr.umd.edu/api/nmrpipe/download?fileName=plugin.smile.tZ"
chmod a+r *.tZ *.Z *.tar
chmod a+rx *.com
./install.com <i><div>(Use +nopost if graphics problems interrupt the install) </div></i>
cd <i><div>(go back to home directory)</div></i>
<i><div>(Edit .cshrc to insert NMRPipe initialize commands)</div></i>
<i><div>(Log out, log in again, test the software)</div></i>
<i><div>(Try Mac "terminal" app if running nmrDraw from "xterm" fails)</div></i>
<i><div>(Adjust the software settings if needed)</div></i>
</pre>The *.tZ files can be deleted after installation if desired.
Installing NMRPipe on Linux
There are versions of NMRPipe built on CentOS 6.5 (linux212_64), Ubuntu 20 (linux231_64), Ubuntu 22 (linux235_64), and Ubuntu 24 (linux239_64). The install procedure will attempt to automatically select the best version, but you can explicitly choose a version when running the install script, for example:
./install.com +type linux231_64Most Linux systems will require additional libraries and fonts
in order to use NMRPipe. Some versions of NMRPipe, such as linux212_64,
have only 32-bit versions of nmrDraw
that will
require 32-bit libraries. If the correct libraries are not
installed, NMRPipe components will generate error messages
or possibly not run at all, or generate Command not found
error messages.
If the required fonts are not installed, the nmrDraw
program
might fail with a message like the following:
XView warning: Cannot load font
XView error: Cannot open connection to window serverLately, many Linux systems do not include the C-shell by default; in these cases, you will have to install a C-shell on your system before being able to install or use NMRPipe. On some linux systems, the C-shell (or T C-Shell) can be installed with a command such as:
yum install csh
yum install tcshWhen using NMRPipe for the first time, if an error message indicates that a required
library is missing, you can try using the library name directly to find a suitable update.
The specific details will depend on your version of Linux, and which commands are needed
to install updates, usually yum
(Red Hat, CentOS, older versions of Fedora),
apt-get
(Ubuntu), or dnf
(Fedora, Alma).
For example, for the error message Error while loading shared libraries: libX11.so.6
try:
yum install libstdc++.so.6As an example, on Ubuntu 22 64-bit systems, the following commands were required in order to use NMRPipe:
apt-get install tcsh
apt-get install xterm
apt-get install libx11-6:i386
apt-get install libxext6:i386
apt-get install xfonts-75dpi
apt-get install msttcorefontsOn AlmaLinux 9.6 64-bit systems, the linux231_64 version of NMRPipe should be used:
dnf install csh
dnf install xterm
dnf install xorg-x11-fonts-75dpi
dnf install xorg-x11-fonts-100dpi
./install.com +type linux231_64Special Note About AlmaLinux: By default, the AlmaLinux desktop does not have a permanent command dock, which might be inconvenient for those who use many terminal windows, as is commonly the case when using NMRPipe. The AlmaLinux desktop can be configured so that there is a command dock that stays on the screen, as is common with most other desktop environments. This is done via gnome extensions which can be found and installed via the Software icon in the AlmaLinux dashboard. The extension to enable is called "Dash to Dock".
For Ubuntu 24 64-bit systems, the nmrDraw graphical interface might not work with the Ubuntu 24 default gnome desktop environment. In case of problems, try installing the MATE X11 desktop and select it at login:
apt-get install tcsh
apt-get install xterm
apt-get install xfonts-75dpi
apt-get install xfonts-100dpi
apt-get install msttcorefonts
apt-get install mate-desktop-environmentIf Ubuntu 20 or higher is being installed as a virtual machine in VMware, this command might be required to allow mounting of directories shared between Ubuntu and the host operating system:
sudo vmhgfs-fuse .host:/ /mnt/hgfs/ -o allow_other -o uid=1000On CentOS 6 and 7 64-bit systems, first edit the file /etc/yum.conf
and add the following line so that 32-bit versions of libraries will be installed:
multilib_policy=allAfter adjusting the yum configuration file above, install the required libraries:
yum install -y libgcc
yum install -y glibc
yum install -y libX11.so.6
yum install -y libXext
yum install -y libstdc++
yum install -y xorg-x11-fonts-75dpi
yum install -y xorg-x11-fonts-ISO8859-1-75dpiIn other respects, installation of NMRPipe on a Linux system can be performed via the "general" steps, for example:
// (If possible, use the command chsh or other method to set the default shell to C-shell)
// (Create an "xterm" terminal window; run csh if the C-Shell is not the default shell)
cd *(go to home directory)*
mkdir nmr
cd nmr
wget -O install.com "https://www.ibbr.umd.edu/api/nmrpipe/download?fileName=install.com"
wget -O binval.com "https://www.ibbr.umd.edu/api/nmrpipe/download?fileName=binval.com"
wget -O NMRPipeX.tZ "https://www.ibbr.umd.edu/api/nmrpipe/download?fileName=NMRPipeX.tZ"
wget -O s.tZ "https://www.ibbr.umd.edu/api/nmrpipe/download?fileName=s.tZ"
wget -O dyn.tZ "https://www.ibbr.umd.edu/api/nmrpipe/download?fileName=dyn.tZ"
wget -O talos_nmrPipe.tZ "https://www.ibbr.umd.edu/api/nmrpipe/download?fileName=talos_nmrPipe.tZ"
wget -O plugin.smile.tZ "https://www.ibbr.umd.edu/api/nmrpipe/download?fileName=plugin.smile.tZ"
chmod a+r  *.tZ *.Z *.tar
chmod a+rx *.com
./install.com
cd *(go to home directory)*
// (Edit .cshrc to insert NMRPipe initialize commands)
// (Log out, log in again, test the software)
// (Adjust the software settings if needed)The *.tZ files can be deleted after installation if desired.